
Turns!: Download inpa free
| Download inpa free | 418 |
| Download inpa free | 285 |
| Download inpa free | 558 |
| Download inpa free | 380 |
| Download inpa free | 578 |
Download inpa free - opinion
Free BMW INPA and Installation on WinXP-Win10
BMW INPA Ediabas 5.0.2 download, inpa 5.06 download, inpa 6.4.7 download here…and install it on Windows XP/ Vista or Windows 7/ 8/ 10 (32bit or 64bit), to get it work with K+DCAN USB cable.
INPA download
INPA 5.0.2 download (tested OK)
Inpa v5.0.2 Ediabas v6.4.7.rar
INPA 5.0.6.rar
INPA/ediabas 6.4.3 full.rar
ediabas 6.4.7 inpa 5.0.1.iso
More: INPA Ediabas download
BMW inpa cable
Basically, there are two methods for users to get the INPA K+DCAN usb cable, to buy a complete one or simply build one yourself. Read the following to get it.
One way is to build a cable yourself. Cost for this would probably range anywhere between 10 to 20 bucks. You will need to solder a bit but it’s nothing too serious if you follow the instructions to the letter.
Its actually very simple that any average person can do that has access to a drill and a soldering gun.
Tools needed..
1. Small philip screwdriver to take the D-can cover off
2 Radio Shack micro on/off switch (can be two prongs or three) and some wire 24 guage.
3. Soldering gun
4. Some type of glue gun or glue adhesive
5. Drill bit 5/16 to make hole in the D-can cover
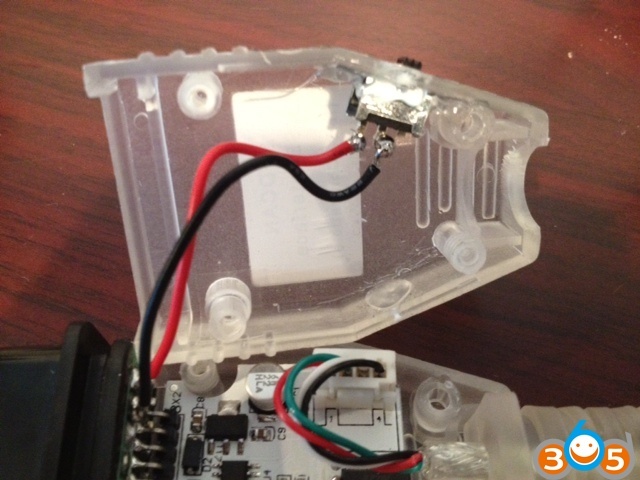
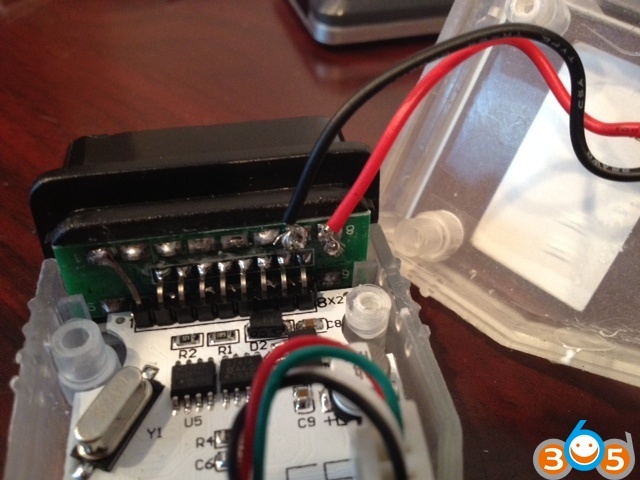
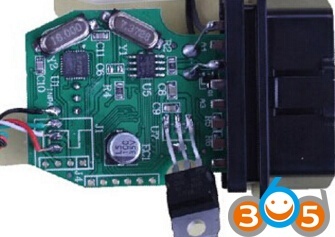
Locate pin 8 which will have a number on the side of the board. One side will have the digit 1 and the other digit 8
Once you locate pin 8, thats the pin we will be using as well as the next one over. Connect each pin 7 and 8 with a separate wire and then use the soldering gun and connect each wire to the micro on/off switch… If you bought a 2 prong on/off switch connect it to each side, but if you bought a switch with three prongs, connect the middle and one of the ends, doesnt matter which one. At the end there will be one prong end not used…Neatly place the wires snug so that the D-can cover can be closed without anything preventing it to make a closed seal and your done. Screw in the 4 philip head screws in their respected holes. Note which postion is on and which is off by some type of label on the outside of the cover…SImple! Note on my first pic, I have a switch with 3 prongs, but I snipped off the 3rd one just to make it easier to solder…
![]()

I modified my cable with a switch and have 7 and 8 bridged to work with a 2004 E46. INPA and Dis 44 work perfect but I cant get Progman to work. Progman starts to reads the FA/ZCS after you choose the car model and then after awhile it says it requires an Edic/Icom cable connection. What needs to be done to make connection with Progman SSS V32?? Do I need to change anything in the Ediabas configuration. I know my modified cable works fine now that I modified it because Dis 44 and INPA wasn’t communicating before I modified the cable. Thanks for the help. I am stumped as I want to code the car for my brother-in-law. I actually can use Dis 44 as I already went into the CKM coding menu, but Progman is much better to help him choose his features he wants as its pretty much offers a checklist with dots!
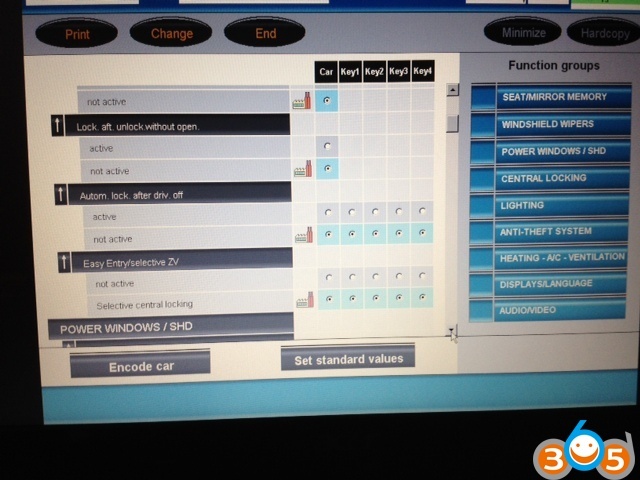
Took a pic of my success with my modified D-can cable connected to E46 using Progman. My brother-in-law had no idea he had so many features that were not turn on…He also turn off his daytime running lights which he hated!
(NOTE: this diy guide is from cn555ic at e90post.com, the professionals have not tried, put it here )
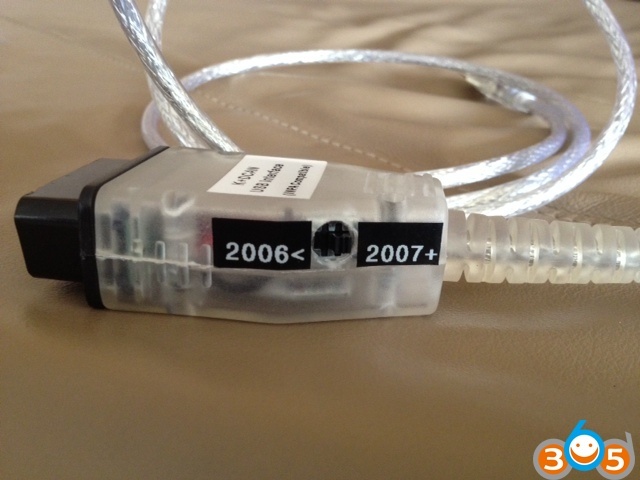
But if you are not interested in building one, buy a dedicated BMW cable instead. This is a site that has been confirmed working by some of E-series friends:http://www.obdii365.com/wholesale/bmw-inpa-k-can-with-ft232rq-chip.html .. I wouldn’t recommend other sites, although they may work, problem is that they have not been confirmed working yet. Functions of k+dcan cable at obdii365 has been tested for years (many discussion in forums).
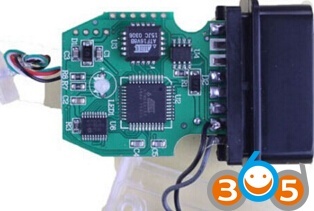
The version 2016 cable is great, designed with the FT232RQ chip and a switch to turn LEFT is for 7 pin or RIGHT for 8 pin (8 pin for K-LINE communication (old DCAN cables cannot do it) for BMW from 1998 to 2008)
the chips and switch on the cable….
INPA installation guide…Here you go…
Here, inpa installation guides for Windows XP, Windows Vista 32bit, Windows 7 32,Windwos 7 64bit, Windows 8, Windows 10 users. (click on the Operation System to get the how-to guide directly).
Note: INPA 5.0.2 is verified to work XP systems without any issues. For others, you need luck!
How to install inpa on windows xp
Inpa installation video made by obdii365.com officially
I’ve used this install method without fault on umpteen machines now and not had to amend any registry settings or anything, its worked first time every time this way..
there is a myth you have to use com port 1 with INPA this is total cobblers! you can use any com port number you like as long as the INPA OBD.ini file port selection matches your actual com port setting on the vagcom interface you have set..
First things to do is Download the 326MB version of BMW INPA from a torrent site or anyware you can get it ( and extract it to a folder on your machine..
you also may need to download the FDTI VCP (virtual com port) driver for windows XP for the Vagcom USB interface from the FDTI website, unzip it to a folder and copy this folder to the 326MB INPA installation software folder so you know where it is and for any future installations…
Virtual COM Port Drivers
- Insert your modded OBD-II-USB vagcom cable into your usb-port
-once it is detected by windows and prompts for the driver (at this point windows may find the drivers for you depending on the vagcom type) point it towards your FDTI vcp driver folder in the INPA folder if windows fails to find the drivers…
It will then install the drivers (it will probably go thru this process twice just repeat the process)
In the windows Device Manager, you should now see [Ports COM & LPT] ->> “USB Serial Port (ComX)
right click this and click properties/port settings /advanced.
at the top change your port number to your selection( if you do not wish to move or force a device on COM1 to another port because its already being used just select an unused port usually COM2 is unused) just remember your port selection for the INPA\install.
Now change the transmit and receive settings in the drop down boxes to 2048 for both transmit and receive
Now change the latency setting from 16 to 1
Ok the changes and exit
The usb vagcom cable is now setup.
- Always use SAME USB-port from now on.
- Installing INPA
you must copy and paste your downloaded complete INPA installation software folder to your C drive.
in your INPA folders click programmisation then double click setup.
It should default to English so ok this.
Click next till you get to the selection for software to install.
Select or deselect in options boxes but as a minimum select INPA ,EDIABAS and NCS expert if you want it.
Click next you will be asked to backup and restore (I declined this , unticked the box and skipped it all)
Make sure quick launch and desktop icons are ticked.
Click next.
Now select STD-OBD in drop down box (should be by default).
Click next.
Now select the com port number you selected earlier from the drop down box and tick the USB to serial adaptor box.
Click next and install (if it ask for backup and recovery just click skip to these prompts if you wish)
Finish install
Reboot
Now go to C/ediabas/hardware/OBD/OBDsetup.exe
Double click OBD setup.exe
If all is well you should get a black DOS box up with various settings shown with a full house of ok’s on them, you may get the start one saying warning instead of an ok if you have selected an alternative com port just ignore it)
press any key to exit if the list is ok.
Reboot
Go to C/ediabas/bin..
Find the OBD.ini or OBD file and double click
Your settings will be dispayed make sure they read as below
PORT= COM? (your com choice entered and set earlier)
HARDWARE=USB
RETRY=ON
UBAT=OFF (type this command in manually in this position)
Exit and save
Right click andCopy the amended OBD.ini file and paste it into your C/windows folder
Now go back to the INPA \install folder on C drive.
Open C/INPA folder/REFERENZ/INSTALL.
Double click instprog.exe
Ok the german writing page
Select English and continue.
At destination drive page make sure C drive is selected and continue.
Now select BMW “GROUP RECTIFICATION PROGRAMME UK” from the list and click continue
Now select the following:
Ediabas tick update box
INPA tick update box
NCS expert expert tick complete box
click continue
Tick the box “delete the old NCS expert “
Click install
double check that C:\EDIABAS\BIN has been added to the path string in enviromental variables (right click my computer/properties/advanced/enviromental variables and select path in the list, click edit check its there and exit without changing anything)
That’s it. you should be done and ready to get diagnosing
Always use the SAME USB port on your laptop when using the software…
PS if you want to do recoding with NCS expert (highly doubtful like its in german and impossible) you need ignition sensing which you dont get with a Vagcom but you can flip the FDTI chip (FT232RL chipset) on the interface with Mprog software to fake the batt and ignition sensing so you can encode…
bmw inpa windows vista 32bit
here is my successful INPA install method for Vista (i have been told it works for WIN7 32 bit too)….
- Firstly again open up your £7 Vagcom interface by removing the 4 x phillips screws on it
Get yaself a fine soldering iron and with a blob of solder,solder pins 7 and 8 together on it and put it back together…
there is a myth you have to use com port 1 with INPA this is total cobblers! you can use any com port number you like as long as the INPA OBD.ini file port selection matches your actual com port setting on the vagcom interface you have set..
First things to do is Download the 326MB version of BMW INPA from a torrent site or anyware you can get it or just PM me If you want a known good working version to download, i have uploaded it zipped with WinRar with the FDTI drivers included just extract it to a folder on your machine…
IF YOU HAVE YOUR OWN COPY you also may need to download the FDTI VCP (virtual com port) driver for some windows OS’s for the Vagcom USB interface from the FDTI website, unzip it to a folder and copy this folder to the 326MB INPA installation software folder so you know where it is and for any future installations…
Virtual COM Port Drivers
.NOTE THIS INSTALL METHOD IS FOR WINDOWS VISTA 32 bit ONLY!
Insert your modded OBD-II-USB vagcom cable into your usb-port
-once it is detected by windows and prompts for the driver if it does not find the driver then point it towards your FDTI vcp driver folder in the INPA folder…
It will then install the drivers (it will probably go thru this process twice just repeat the process)
In the windows Vista Device Manager (computer/system properties/device manager), you should now see [Ports COM & LPT] ->> “USB Serial Port (ComX)
right click this and click properties/port settings /advanced.
at the top change your port number to your selection( if you do not wish to move or force a device on COM1 to another port because its already being used just select an unused port usually COM2 is unused) just remember your port selection for the INPA\install.
Now change the transmit and receive settings in the drop down boxes to 2048 for both transmit and receive
Now change the latency setting from 16 to 1
Ok the changes and exit
The usb vagcom cable is now setup.
- Always use SAME USB-port from now on.
- Installing INPA
you must Copy and paste your downloaded complete INPA installation software folder to your C drive.
In your INPA folders double click the programmisation folder- then right click the setup icon and select “Properties/Compatibilty mode select XP service pack 2 and tick the box, click the apply button and exit now double click the setup icon and begin the setup.
It should default to English so ok this.
Click next till you get to the selection for software to install.
Select or deselect in options boxes but as a minimum select INPA ,EDIABAS and NCS expert if you want it.
Click next you will be asked to backup and restore (I declined this , unticked the box and skipped it all)
Make sure quick launch or desktop icons are ticked.
Click next.
Now select STD-OBD in drop down box (should be by default).
Click next
Select Com port number (you selected earlier) in the drop down box, tick the USB serial adaptor box
Click next and install (if it ask for backup and recovery just click skip to these prompts if you wish)
Finish install and Reboot
Now go to C/ediabas/hardware/OBD/OBDsetup.exe
Double click OBD setup.exe
If all is well you should get a black DOS box up with various settings shown with a full house of ok’s in Vista this will be full of errors and missing OK’s we shall address this later with a registry edit..
press any key to exit the list.
Reboot
Go to C/ediabas/bin..
Find the OBD.ini or OBD file and double click
Your settings will be dispayed make sure they read as below
PORT= COM? (your com choice entered and set earlier)
HARDWARE=USB
RETRY=ON
UBAT=OFF (type this command in manually in this position)
Exit and save
Right click and Copy the amended OBD.ini file and paste it into your C/windows folder
Now go back to the INPA \install folder on C drive.
Open C/INPA folder/REFERENZ/INSTALL.
Right click Instprog.exe/Properties/Compatibilty select windows XP service pack 2 and tick box and apply and exit.
Double click the instprog.exe and install
Ok the german writing page
Select English and continue.
At destination drive page make sure C drive is selected and continue.
Now select BMW “GROUP RECTIFICATION PROGRAMME UK” from the list and click continue
Now select the following:
Ediabas tick update box
INPA tick update box
NCS expert expert tick complete box
Click continue
Tick the box “delete the old NCS expert”
Click install
Double check that C:\EDIABAS\BIN has been added to the path string in enviromental variables.. (Computer/System Settings/Adavanced System Settings/Environmental Variables” click edit check its there and exit without changing anything)
You can now test INPA on your car it will work with the INPA diags only and you will get error warnings with Ediabas running because of the OBDsetup command errors earlier,to address this copy and paste the following below into a notepad folder, save the file to your desktop and name the file “serial.reg” and select all files and save…
- COPY and PASTE all registry data below…
Windows Registry Editor Version 5.00
[HKEY_LOCAL_MACHINE\SYSTEM\CurrentControlSet\Servic es\Serial]
“ErrorControl”=dword:00000000
“Group”=”Extended base”
“Start”=dword:00000002
“Tag”=dword:00000001
“Type”=dword:00000001
“ForceFifoEnable”=dword:00000001
“RxFIFO”=dword:00000008
“PermitShare”=dword:00000000
“LogFifo”=dword:00000000
“TxFIFO”=dword:00000008
[HKEY_LOCAL_MACHINE\SYSTEM\CurrentControlSet\Servic es\Serial\Parameters]
[HKEY_LOCAL_MACHINE\SYSTEM\CurrentControlSet\Servic es\Serial\Enum]
“0”=”Root\\LEGACY_SERIAL\\0000″
“Count”=dword:00000001
“NextInstance”=dword:00000001
“INITSTARTFAILED”=dword:00000001
You must copy and paste all the above including the windows registry bit or it will not execute to the registry later.
You now need to backup the registry just in case so you can restore it if need be…
Click the windows icon start button bottom left on desktop and type in regedit in the small box and press enter to access the registry
Click file then Export and name the file something of your choice and select ALL in the export range box and save it to somewhere safe..
Now double click the serial.reg file and apply it to the registry (right click the file and open with registry editor if it opens in notepad by default)
Go back to to C/ediabas/hardware/OBD/OBDsetup.exe
Double click setup the blackbox should be clear of errors (you may get 1 if you have selected an alternative port number other than COM1 ignore it)
You now should be good to go with full functions and no error messages when using your INPA…
inpa installation windows 7 32bit
This DIY was tested with Windows 7 Home Premium Service Pack 1 (SP1) running on a circa 2008 Lenovo S10 netbook with a K+DCAN cable from one stop electronics.com. My netbook is used solely for coding and as such this DIY assumes that your computer is dedicated to this purpose as well.
I recommend starting with a fresh 32-bit Windows 7 installation in order to collect the necessary INPA 5.0.2 configuration files that you will need after installing BMW Standard Tools 2.12. I suggest disabling Windows Update automatic updates during the Windows 7 installation process. After entering your product key, the following screen will pop up security message.
Select “Ask me later”, this will prevent Windows 7 from automatically installing any updates.
If your installing from pre-SP1 Windows 7 media, I highly recommend that you manually install two Microsoft updates:
System Update Readiness Tool (KB947821):
http://www.microsoft.com/en-us/downl…s.aspx?id=3132
Windows 7 Service Pack 1 (KB976932):
http://www.microsoft.com/en-us/downl…s.aspx?id=5842
During testing pre-SP1 Windows 7 no longer displayed a mouse pointer after successfully installing EDIABAS & WinKFP and rebooting the system.
INPA 5.0.2 can be found here:
INPA-EDIABAS full English Edition
Installation Guide
Follow steps 2 through 6 of the installation guide. During the EDIABAS & WinKFP install (step 3), select Windows XP (this is not mentioned in the installation guide.) For all other selections, accept the default and click Weiter which is German for “further.”
The very first time you attempt to install EDIABAS & WinKFP (step 3), regsvr32 will fail to register two Windows ActiveX controls. This is normal, upon re-installation everything will work properly.
Click on OK and then click on the large red circle with a white X at the bottom of the screen to see the second regsvr32 error.
Click on OK to acknowledge the second error.
Press any key to exit the EDIABAS OBD setup program. Don’t be concerned about any registry key warnings, this installation of EDIABAS will never be used.
When prompted to reboot, select Nein for “No” and then click on Beenden or “End” to exit the installation program. Go to Control Panel and uninstall the program.
Once you have uninstalled the program, reinstall it. On the second attempt, the ActiveX controls will register properly.
This time, select Ja for “Yes” and reboot.
Even with SP1 installed, on occasion the system will no longer display a mouse pointer after rebooting the system at this point. If this happens, depress the Windows logo key (on some keyboards it may have an icon of a house instead) to display the Start menu. Depress the right arrow key once and then depress Enter to initiate a proper shutdown. When powered back on, the system should have a functional mouse pointer.
Continue with steps 4-6 in the installation guide.
At the completion of step 5, the Windows Program Compatibility Assistant may appear. Click on “This program installed correctly.”
At this point you could optionally install the latest EDIABAS/INPA update (ES-76) from FAL’s EA-90X distribution. I don’t recommend doing so as the latest INPA scripts are in German and not necessary for coding. Installation of the ES-76 update is outside of the scope of this DIY.
You now have the base INPA scripts and configuration files that you’ll need to get the latest version of INPA (5.0.6) up and running. Copy the the INPA CFGDAT and SGDAT folders to removable media for safe keeping. They are located in C:\EC-APPS\INPA.
If your curious, INPA 5.0.2 is operable at this point. If you were to install the K+DCAN drivers from Windows Update, set the cable to COM1, etc. the battery and ignition clamps are working properly.
That’s cool, but INPA 5.0.2 and friends are not totally compatible with the latest SP Daten files (i.e. 50.2), so let’s move on to installing BMW Standard Tools 2.12.
Links to BMW Standard Tools 2.12 and NCS Expert profiles can be found in this post:
http://www.e90post.com/forums/showpo…postcount=4476
SP Daten 50.2 can be found in this thread:
http://www.e90post.com/forums/showthread.php?t=882353
Blow away your previous installation of Windows and start over with a fresh install. INPA 5.0.2 and friends made changes to the Windows registry, etc. Now that we have the two folders needed to bootstrap INPA 5.0.6, it’s best to reinstall Windows. If your installing from pre-SP1 Windows 7 media, don’t forget to install the System Update Readiness Tool (KB947821) and Windows 7 Service Pack 1 (KB976932.) In addition, because this will hopefully be your final re-installation of Windows I suggest that you manually install one additional Microsoft update:
Microsoft .NET Framework 4.5.1:
http://www.microsoft.com/en-us/downl….aspx?id=40779
When the K+DCAN cable is initially plugged in, Windows will indicate that the device driver was not successfully installed.
Click on the white box circled above when it appears to change the driver update settings.
Click on “Change setting.”
Select “Always install the best driver software from Windows Update” then click on “Save Changes.”
Windows Update will install the latest FTDI drivers needed for the one stop electronics.com K+DCAN cable. Notice that the FTDI driver has defaulted to USB Serial Port COM3. You need to change this to COM1. Click on “Close.”
Click on the Windows Start button to display the Start menu. In the Start Search box type the following command and depress Enter to launch Device Manager:
Code:
mmc devmgmt.msc
When Device Manager opens, click on the arrow to the left of “Ports (COM & LPT)” to expand the Ports device tree. Double-click on “USB Serial Port (COM3)” to open the device properties.
Click on the “Port Settings” tab and then click on the “Advanced” button to display the Advanced Settings for COM3.
Change the COM Port Number to COM1 and the Latency Timer to 1 msec and click “OK.”
The USB Serial Port should be set to COM1. Close Device Manager.
Install BMW Standard Tools 2.12. Accept the defaults and click “Next.”
When prompted to select additional tasks, de-select the “Execute backup and restore wizard” selections under Data backup. You don’t have an existing installation of BMW Standard Tools to backup. Click “Next.”
Click “OK” to acknowledge that the backup wizard has been deactivated.
When the Hardware Interface Settings screen appears, select “USB to serial adapter” then click “Next.”
Click “Finish” to complete the BMW Standard Tools setup and restart your computer.
Please note: This section of the DIY could be improved for neophyte Windows users. It assumes that you understand command line syntax. In this context, X:

-