

Agree, the: Downloading pictures from iphone to my pc
| MATH BLASTER MASTER THE BASICS DOWNLOAD FREE MAC | 542 |
| GOOD TROUBLE SEASON 2 TORRENT DOWNLOAD | 184 |
| LIFE IS FEUDAL MODS FOGOFF DOWNLOAD | 687 |
| KGB ARCHIVER DOWNLOAD GETINTOPC | 508 |
| CALL ME MAYBE FREE MP3 DOWNLOAD | 170 |
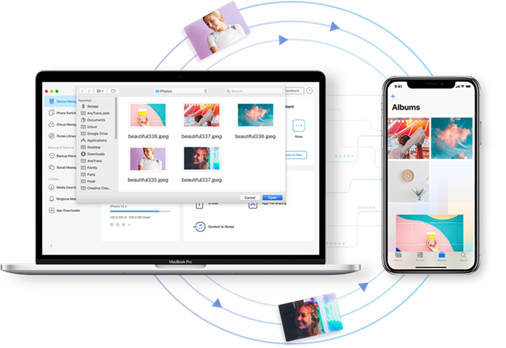
How to Transfer Photos from iPhone to Computer (iPhone 12 Included)
How to import photos from iPhone to PC? This article shows you 6 ways to transfer photos from iPhone to the computer(Windows PC & Mac) and works for all iPhones like iPhone 12/11/Xs/X/XR/8/7/6s/6.
I cannot figure out how to import my photos from my iPhone to a folder on my Windows PC. This is my first iPhone and I am not used to iTunes or the sync features. So far I can get it to sync photos from the photo folder on my pc, but not take them from the iPhone and put them on my PC!
Transfer Photos from iPhone to Computer
One day, you’ll find Photos App becomes the biggest storage consumer which may take you more than 30GB (a large number for a 64GB device) or even more on your iPhone. Photos take 47GB of my 128GB iPhone 11, which is a lot. At this moment, you have to consider transferring all photos from iPhone to your computer and deleting them to free up space. How do I transfer my photos from my iPhone to my home computer? Here you will get 6 ways to move your iPhone photos to the computer (Windows or Mac).
Transfer & Manage iPhone Photos with AnyTrans
To transfer and manage all your iPhone photos in one place, here we recommend you an iPhone data manager – AnyTrans, which makes it easy to export, import, delete iPhone photos to anywhere you like.
AnyTrans – iPhone Photo Transfer
- Transfer 3000 photos from iPhone to PC/Mac within minutes.
- Transfer all photos including Places, People, Photo Videos, etc.
- Zero quality loss and convert HEIC to Windows compatible format.
- 1-click transfer or transfer photos selectively as you need.
AnyTrans supports the newest iOS 14 as well as iPhone 12. So you can use it to transfer photos from your iPhone 12/11/XS/XR/X/8/7/6s/6 to computer.
There are two options to transfer iPhone photos to a computer with AnyTrans: 1-click to export all iPhone photos or choose some specific photos to transfer. Here we will show you how to preview and transfer iPhone photos to a computer with AnyTrans.
1. First of all, you need to free download AnyTrans on your PC or Mac computer, install and run it.
2. Run AnyTrans, and then connect your iPhone to the computer with its USB cable > Under Device Manager > Click Photos.
Go to Device Manager and Click Photos
3. Select the album with photos you want to transfer to PC, like My Photos (including Places, People, and more), Albums, Recently Deleted, etc.
View Albums with AnyTrans
4. Select the photos you want to transfer > Click Send to PC (or Mac) button to get selected iPhone photos to your computer.
Select Photos and Send to PC
5. When the transferring process finished, all the photos exported from the iPhone will be saved on your computer in the right folder. And you’ll find all the photos are organized in folders like Live Photos, Camera Roll, Panoramas, etc.
View Photos in Category on PC
Video Tutorial to Transfer Photos from iPhone to Computer
Transfer Photos from iPhone to PC Windows 10
How do I transfer photos from iPhone to PC without iTunes? Just like the Photos App on Mac, Windows 10 also has a Photos App. If you are working with a Windows 10 computer like this, follow us to transfer photos from iPhone to PC with Photos App as below steps:
- Download the latest iTunes on your PC.
- Plug your iPhone with a USB cable and the Photos app should pop up. Open the Photos app from the Start menu if it doesn’t launch automatically.
- Unlock your iPhone and trust the PC.
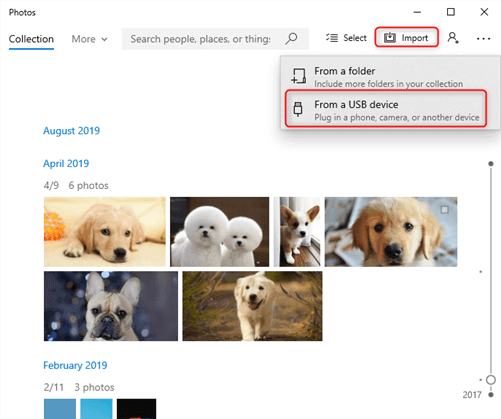
- Click the Import button from the Photos app in the top right corner.
- Choose “from a USB Device”, which will allow you to import photos from your iPhone to your PC.
- It will start searching for photos on your iPhone, choose photos you want to import, and then click Import again.
- Choose photos you want to import and then click Continue again. Select where you want to save the photos.
- Once it finished importing the photos, they can be found in folders within your Pictures folder.
Transfer iPhone Photos with Windows Photos
Import Photos to PC with File Explorer
Windows treats the iPhone as a digital camera or file system, so you can import photos from iPhone to PC with File Explorer (named Windows Explorer on Windows 7). Follow the steps below to import photos from iPhone to PC with File Explorer:
- Install the latest version of iTunes on your PC.
- Connect your iPhone to PC > Open This PC from the desktop to launch File Explorer or press theWindows key + Eshortcut on your keyboard.
- Find your iPhone it will appear under Portable Devices Sections.
- Double click your iPhone icon to open your iPhone > You’ll see the Internal Storage icon > Double click it to open it.
- You’ll see the DCIM folder that is the Camera Roll folder > Double click open it > Open one folder to see if it contains the photos you want to transfer.
- Select the photos you like and copy them > Paste them to the desired folder of your PC.

Transfer iPhone Photos with File Explorer
Transfer Photos from iPhone to PC Windows 7
How do I transfer photos from iPhone to Windows 7? You can get photos off iPhone with AutoPlay on Windows 7. When transferring photos via AutoPlay, you can’t import a single picture you want, instead, you need to import all iPhone photos it supported. Here is how to Import iPhone photos to a Windows 7 PC:
- Download the latest iTunes on your PC.
- Connect your iPhone to the Windows 7 PC, and unlock it to trust the PC on your iPhone.
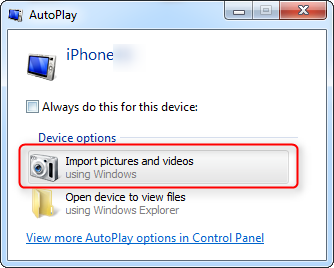
- If the AutoPlay window appears, click “Import Pictures and Videos using Windows”.
- Click the Import Settings link > Change the folder to which your Camera Roll’s photos will be imported by clicking the Browse button next to the “Import to” field.
- After setting up your import options, click OK > Choose a tag if desired and click the Import button.
Import iPhone Photos to Windows 7
Recently, some users reported that photos won’t upload on Windows due to they are saved in HEIC format. It is not clear whether because of the format. But, if you’re facing this problem too, here are two fixes for you:
1. Give a try on a hassle-free iMobie HEIC converter to change these photos to JPG afterward try again. Here is a detailed guide which tells you how to do that with this tool: How to Convert HEIC to JPG on Computer >
2. Using AnyTrans to transfer HEIC photos to the computer directly because it supports auto conversion during the transferring process. What you need to do is set up the export format of HEIC photos before starting.
Transfer iPhone Photos to PC with iCloud Photos
iCloud Photos on Windows helps you sync photos from iPhone to iCloud, so you can easily download the pictures from iCloud to your PC. Here is how to transfer photos from iPhone to PC with iCloud Photos, follow the steps below:
- Enable iCloud Photos or iCloud Photos Library based on your device: Tap Settings > Photos > iCloud Photos (or iCloud Photo Library).
- Now photos will be uploaded to iCloud with Wi-Fi.
- Download the iCloud for Windows app onto your PC > Install it on your PC > Then sign in using your Apple ID the same as the one on your iPhone.
- Check Photo > Then select Download new photos and videos to my PC > Click Done > Apply.

Transfer iPhone Photos to PC with iCloud Photos
From now on new photos you take with your iPhone will now automatically transferred to your PC whenever you have Wi-Fi.
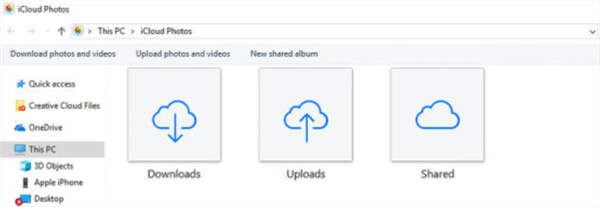
- To download photos from iCloud, open Windows File Explorer on Windows.
- Click on This PC (or Computer on Windows 7) on the left of the screen. Double-click on iCloud Photos.
- Then double-click on Downloads. Now you can view your iCloud folders of photos.
Transfer iPhone Photos to PC with iCloud Photos
Why Can’t I Transfer Photos from iPhone to PC? FAQs
You may meet some problems when transfer iPhone photos with the above ways, here are faqs related to the iPhone photo transfer issues on Windows PC:
1. iPhone internal storage empty/iPhone DCIM folder empty
We have a detailed guide to help you fix the iPhone DCIM folder empty issue, here are the main solutions you can try:
- Make sure your iPhone allows your PC to access it: go to settings on iphone > Reset > Reset location & Privacy > Unplug the cable and plug back in.
- On your PC click on the Start menu > Open Device Manager > Expand Portable Devices > Right-click on Apple iPhone > Select Uninstall and tick the box beside Delete the driver software for this device > Click OK > Unplug your iPhone and restart your PC. After the PC restarted, plug in your iPhone and check if the issue persists.
- Make sure the DCIM folder is not hidden by you: Open File Explorer on your PC > Go to View > Show/Hide > Check if the DCIM folder is hidden.
2. A device attached to the system is not functioning
This error may occur when your iPhone has a connectivity issue with the PC. Another possible reason is that on Windows 10 when you copy your HEIF or HEVC photos on your iPhone to a PC, they are automatically converted to JPEG formats. However, during the process that the error “A device attached to the system does not work correctly” can occur.
- Reconnect your iPhone to your PC and try a different USB port or a different USB cable.
- Restart your PC and your iPhone.
- On your iPhone, go to Settings > Photos > Transfer To MAC or PC > Keep Originals.
- Update iTunes to the latest version on your PC.
3. “File Explorer” Not Showing on Windows 10
To open File Explorer in Windows 10, you can:
- Press the Windows logo key + E on your keyboard
- Select Start > Documents
- Open This PC from the desktop
To fix File Explorer not showing on pc, you can try:
- Check for update for your Windows: Select the Start button > Settings > Update & Security > Windows Update.
- Open Start button on PC > Settings > System > Display > Change the size of the text to 100%. Don’t set it to 175%.
- Open My PC or any folder on your PC > Find Quick Access > right click it and click Options > Clear File Explorer history.
4. My computer does not recognize my iPhone
If your computer does not recognize the iPhone or iPhone not showing up on PC/Mac, try the tips below:
- Unplug and plug in your iPhone several times.
- Restart your iPhone or computer.
- Try a different USB cable.
- Update the device driver: On your PC, click the Start button > Open Device Manager > Expand the Portable Devices > Right-click on the device name and choose Update driver > Select Search automatically for updated driver software.
5. The device is unreachable iPhone
While trying to import photos and videos from your iPhone onto your PC, you may get the error message “the device is unreachable”, you can fix this by: Open your iPhone, go to Settings > Photos > Transfer To MAC or PC > Keep Originals.
6. Can’t transfer large videos or transfer freezes
Many people complain that when transferring hundreds of photos or larger size videos (4K videos), Windows Photos or File Explorer automatically stops transferring it. For this issue, we recommend you try AnyTrans, it does a great job of transferring large videos or multiple files from your iPhone to PC or Mac.
Bonus Tip: Import Photos from iPhone to PC Wirelessly
If there is no USB cable available or your iPhone cannot be recognized by your computer, then you can try the AnyTrans app to transfer photos from iPhone to Mac wirelessly.
Now, connect your iPhone to PC with the same Wi-Fi, and then do as the following steps:
Step 1. Install the AnyTrans app on your iPhone. You can download it by clicking the below button or directly search AnyTrans on App Store.
Step 2. On your PC, enter anytrans.io in your browser, and you’ll see a QR code.

How to Import Photos from iPhone to PC Wirelessly – Step 2
Step 3. On your iPhone, open the AnyTrans app you just installed and tap on the Scan button to scan the QR code on your computer.
Step 4. Then all your iPhone photos will show up on the computer. Select the photos you want to transfer and click the “Download” button to start transferring photos from iPhone to PC.

How to Import Photos from iPhone to PC Wirelessly – Step 4
What If You Are Working with a Mac?
For Mac users, the easiest way to transfer iPhone photos to Mac is using Mac’s Photos app, here is how:
- Download the latest version of iTunes on your Mac. Importing photos to your Mac requires iTunes 12.5.1 or later. Connect your iPhone with a USB cable.
- Unlock your iPhone and Trust your Mac. On your Mac, the Photos app will automatically open. If it doesn’t, open the Photos app from the LaunchPad.
- Click the Import tab at the top of the Photos app and choose photos you want to import to your computer then click Import Selected.
- You can also click Import All New Photos to import all new photos quickly.
To learn more ways of transferring photos from iPhone to Mac like using Image Capture, AirDrop, Preview, please read this guide – How to Transfer Photos from iPhone to Mac to get iPhone photos to Mac.

Import iPhone Photos with Mac Photos
The Bottom Line
Besides copying photos from iPhone to computer, AnyTrans also supports transferring other iOS contents, like Contacts, Messages, Videos, Notes, Voice Mails, Music, etc. Now Download AnyTrans to Try It For Free >
More iPhone Related Articles You May Like:

Member of iMobie team as well as an Apple fan, love to help more users solve various types of iOS & Android related issues.

-