

Downloading and editing pdf - look


There are several software tools available that make editing a PDF a straightforward process. If you’re using your computer or want to edit PDFs with cloud-based software, there are also a few different methods to do so. JotForm’s PDF Editor is also one of the best options you can use for that purpose.
You can also download the PDF version of this PDF editing guide for free!
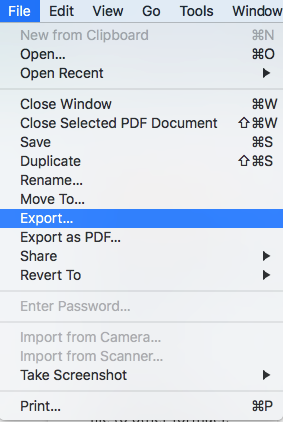
How to edit a PDF in Adobe Acrobat

Acrobat is available for both Mac and Windows, with a subscription to Adobe Creative Cloud.
Follow these steps:
- Open Adobe Acrobat.
- Go to “File,” and click “Open.”
- Choose the PDF file you want to edit.
- Once your file opens, select “Edit PDF” from the toolbar on the right.
- If you want to edit text, place your cursor on the text you want to edit.
- Using the “Format” option at the top of the toolbar, select “Format.”
- To edit an image, place the cursor on the image you want to edit.
- Modify it by using the “Objects” option.
How to Edit a PDF on Mac

Apple provides every Mac with Preview, a free program that allows you to view and edit a PDF and other file types. With Preview, you can highlight text, include a signature, or add text and comments.
Add Text:
- Place your cursor where you want to insert text.
- Go to “Tools,” click on “Annotate,” select “Text,” and start typing.
- To change the font, size, or color, go to “View,” click on “Show Markup Toolbar,” and press A.
- You also can move the text box anywhere on the document.
Highlight Text:
- Select the text you want to highlight.
- Switch the highlight mode on or off by selecting (
 ).
). - If you want to change the color of the highlight, or strikethrough or underline it, click (
 ) and select an option.
 - Anytime you select text, it will highlight as long as the highlight mode is selected.
- To review a highlight, control-click the text and chose “Remove Highlight.”
How to Edit a PDF on Windows
You probably have a copy of Microsoft Word already. Since Word 2013, you can open a PDF file directly and convert it to an editable Word document. You can then edit the document as needed. When finished, save the document as a PDF.
There are dozens of tools that allow you to edit a PDF on Windows; however, most of these come with a price. In additional to Acrobat Reader, Foxit Reader is a free and popular PDF editing tool.
Add Text:
- Go to the “Edit” menu.
- From the toolbar, select the “Edit Text” icon.
- To edit text, place the cursor where you want new text and start typing, or paste in your text.
- If you want to change the font, size, color, or alignment, you can pick those options.
Highlight:
Go to the Comment menu and choose from the following buttons:
- Highlight — Drag your cursor over the text you want to highlight. You can also select the color.
- Strikethrough — Select the text you want to strikethrough, and click on the “Strikethrough” button.
- Leave a note — If you want to leave detailed note, highlight the text and pick the “Note” option. You can type your comments in the area provided.
Best Free PDF Editors

The term PDF reader doesn’t just refer to a program with the ability to let you view a PDF. A dedicated PDF reader usually comes with more functionality, such as converting PDFs, adding signatures, annotating, and combining pages.
We combed the internet, tried a bunch of editors, and found the best free ones for you to try.
Best PDF Editors for Windows
- Acrobat Reader
- Microsoft Edge
- Foxit Reader — Foxit Reader allows the user to create, edit, manage and share their documents with a user-friendly and easy to use interface.
- Nitro PDF Reader — Nitro Pro convert PDF software has useful tools when it comes to creating, editing and distributing PDFs for all sizes of businesses.
- Xodo —Xodo is an easy to use software with the powerful support for editing and collaborating PDFs that is suitable from phones to web-based apps.
- PDF Viewer Plus
- PDF-XChange Editor — PDF-XChange Editor is a software to preview documents, conversion, printing with menus that are easy to customize and highly functional.
- SlimPDF Reader
- Sejda — Sejda is an online PDF management service that allows users to edit, convert, merge and split documents with ease.
- Inkscape — Inkspace software provides users to easily import and export PDF files with its simple interface.
- FormSwift — Using FormSwift online tool, the users can upload the PDF document to the editor and then start editing, digitally signing and sharing the document without any hassle.
- ApowerPDF — ApowerPDF is an online/desktop software that has a very easy to use interface that allows users to edit their PDF documents without any hassle.
Best PDF Editors for Mac
- Acrobat Reader
- Apple Preview
- PDFelement for Mac — PDFelement lets users edit text, read, and annotate their PDF documents with a free account for Android, iOS, and Desktop.
- PDF Expert — PDF Expert is a robust tool with powerful features like editing, annotating and managing pages, which works across iPhones, iPads, and Macs.
- Skim — Skim is a PDF Reader and Note-taker that is a perfect fit for the academic community since it helps the user to read and annotate scientific papers, it also allows the user to view any PDF File.
- PDF Nomad
- PDF Buddy
Can I edit a PDF in Google Drive?
If you have offices in different parts of the country or world and need to collaborate on documents, it can be very difficult to exchange documents constantly through email and work on the most updated draft. Even people who work on the same floor, or in the same building, can run into this same issue.
Google Docs and Sheets allows you to collaborate in real time, provides you with a document-authoring tool, and stores your files online. This makes it easy for multiple users to edit a document at the same time, and see any changes instantaneously.
Google’s answer to word processing and online file storage is now widely used, and you can store and edit PDFs within this framework.

If the PDF document was created from a text document, such as Microsoft Word or Notepad, the PDF file can be opened as a text file in Google Docs.
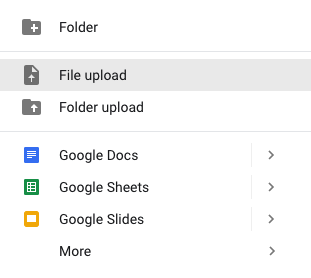
Open Google Docs
- Select the “File upload” icon.
- Click “Upload,” or drag and drop the PDF file to the indicated area.
- Once you’ve uploaded the PDF file, follow these steps:
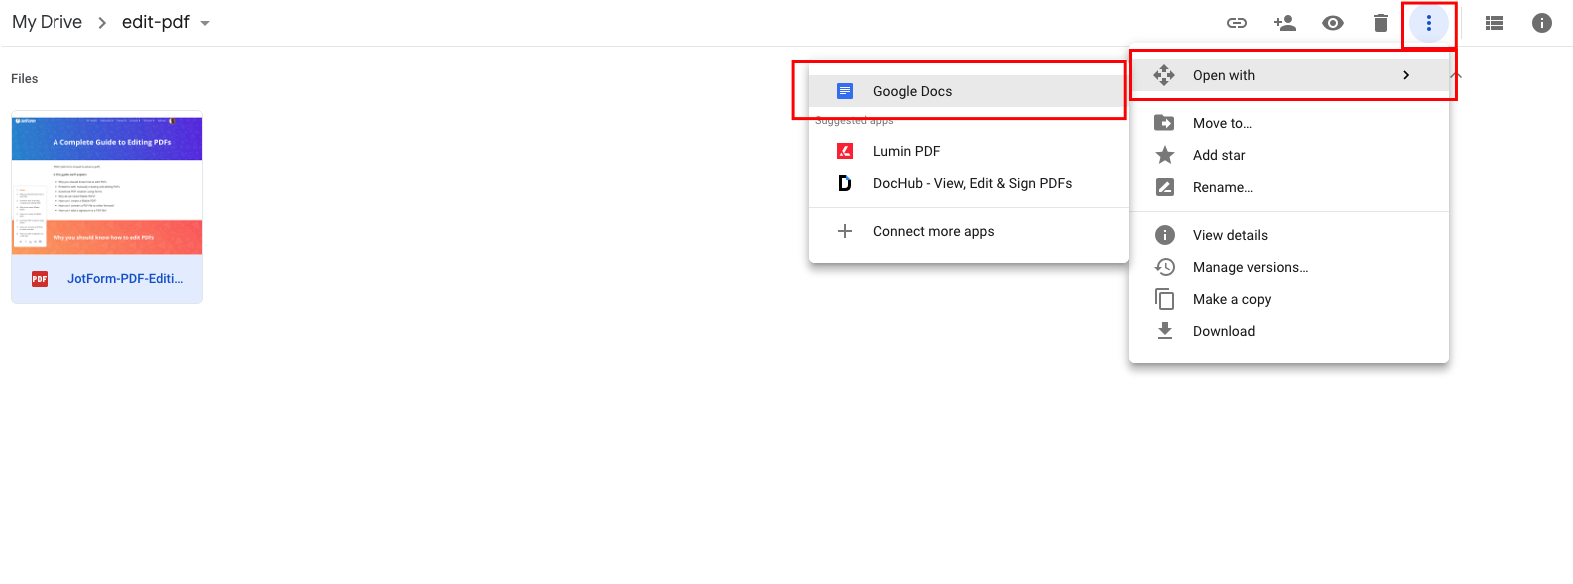
- Select the PDF to open it.
- At the top of the window, you’ll see a drop-down menu. Click on “Open With,” and select “Google Docs.”
- Edit the text as needed.
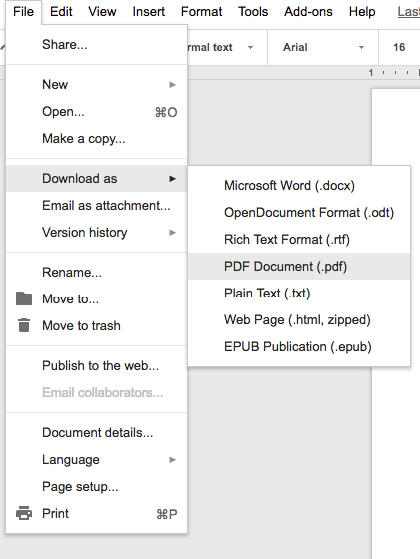
 To export the document to a PDF file, follow these steps:
- Go to the File menu and select “Download As.”
- Select “PDF Document (.pdf).”
- Your document will be converted into a PDF and downloaded to your computer.
How do I compress PDF?
It’s no secret that a PDF can often become bulky and hard to send or upload to the internet. Depending on how you saved the file, there’s a lot of data being stored and the file size can grow quickly. For instance, if you’re sending a PDF to a commercial printer and need 5,000 copies for a trade show, saving the file as “high quality print” is the way to go. However, if you’re sending it to a client to proofread, you don’t need a file size this large.
Reducing the size is not a problem with a robust PDF editing tool. Macs come with Apple’s free Preview app, which can do basically everything you’d want when it comes to PDF editing.
Here’s how to reduce your PDF size on a Mac
1. Open the PDF in the Preview app.
2. Go to “Export as PDF” in the “File” menu.
3. Click “Show Details,” and from the “Quartz Filter” dropdown menu, select “Reduce File Size.”
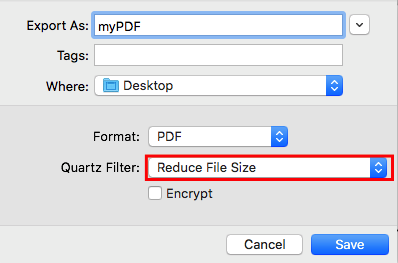
4. Save the new, smaller version of the PDF.
How to reduce the size of a PDF using Acrobat DC (Mac and Windows)
1. Open your file in Adobe Acrobat.
2. Go to “File,” and click on “Save as Other.”
3. Select “Reduce Size PDF…” from the drop-down menu.
4. Determine your compatibility; leaving it as “Retain Existing” is fine. If you need it really small, you can set it to a later version of Adobe Acrobat.
5. Select “OK.”
6. Rename the file, if you want to create a new, smaller version of your original file. This will keep your original, large file. If you keep the name and file location the same, you’ll have the option to overwrite the original file.
7. Select “Save.”
8. Acrobat will ask if you really want to overwrite your original file. Click “Replace,” if that’s what you want to do.
Tip: If you need to shrink multiple PDFs, you can click “Apply to Multiple Files” and a box will appear. Drop all the files you want to reduce into that box and a batch of smaller PDFs will appear.
How do I remove pages from a PDF file?
Having trouble with deleting pages from your PDF? We’ve got you covered with a guide that can teach you how to delete pages in a PDF using Adobe Acrobat and third-party software on the internet. In most cases, the entire process can be done in just a few quick steps — and we have plenty of pictures that you can reference along the way.
Combine multiple PDF files into one single PDF file
Need to merge several PDF files together to create a cohesive document? We’ll show you how to do it using Adobe DC, free online software tools, and Google Chrome extensions — and include a lot of helpful graphics so you can follow along.
Divide a PDF file into pieces
Have a large document that you want to split into smaller sections? Or, do you just need a few pages and want to extract them from a larger document? Check out our blog post about splitting PDF files, where we’ll walk you through the various software tools and programs out there that can streamline your workflow.
Problems with creating and editing PDFs manually
When it comes to PDFs, there’s a lot to love. They make the process of sharing important, print-ready files a breeze. But, like many things in life, PDFs aren’t perfect.
On the PDF creator’s side, it can be tricky to construct a PDF manually when dealing with a lot of information. Oftentimes, companies are faced with lengthy Microsoft Excel sheets that contain troves of data to sift through and organize. They’re burdened with the challenge of taking their collected data and placing it into a PDF document manually – something that’s time-consuming and tedious. To put it lightly, it’s not a project for the faint of heart.
Collecting data is just the first step, though. Once you have the information, you need to figure out how to present it to your audience in a way that makes sense. Formatting can be even more painful than dealing with the data itself because it’s tricky to make all the PDF elements look right. You need to be cognizant of where to insert text, images, and graphics so the end product is easy to understand and looks professional.
Be careful when putting a PDF together because there are many ways for things to go wrong. There are a few issues that plague even the most seasoned PDF professionals. One big problem is getting an image in a PDF to look just right. If a photo’s resolution is low, it will look fuzzy in the PDF, so you must ensure the image is clear and the resolution is high. Another major flub is not setting up the bleed, or margin, correctly. If the bleed isn’t set up right or is missing, then it will look weird when a PDF recipient tries to print it. Lastly, it’s imperative that your PDF dimensions are set up correctly – if you want your PDF to be a particular size, make sure to adjust it so PDF recipients won’t run into printing issues.
Now, let’s shift gears for a moment and talk about the people who receive these finicky PDF files. A 2017 survey conducted by Ghent Workgroup, an international graphic arts think tank, found that errors in PDF files are, perhaps, more common than we may think, even among experts. According to Prepressure.com, close to 17 percent of the survey’s 1,100 respondents — or 187 people — reported finding errors in 50 and 90 percent of the PDF files that they encountered. Another 25 percent of survey respondents — or 275 people — reported finding errors in 10 to 50 percent of the PDF files that came across their desk.
That may sound like a lot of PDF errors floating around, but close to 52 percent of those professionals who were surveyed — or 572 people — reported finding errors in less than 10 percent of PDF files, if any at all.
The fact is that a wide range of things can go wrong at any given time. Even if someone receives a PDF that’s completely free of errors, there may be some information that must be updated, which means that the PDF needs to be edited manually.
Editing a PDF isn’t rocket science, but it isn’t always easy. When edits must be made, people need to use software, which can be either robust and pricey, or basic and free. Regardless of which software you choose to use, it will take time to edit any errors or information.
Problems with editing PDF files manually tend to vary with each case, although there are a few commonalities. There always seems to be a problem with matching font type and size when editing a PDF manually, so be careful when injecting new fonts into your PDF. You can use free tools, such asWhatTheFont, to see what type of font was used in the original PDF and then match it accordingly while editing. There’s also a risk of ruining a document’s format when you want to move elements around. Some software will allow you to shift PDF content around with ease, while some software will require more of a design eye to make everything look just right.
It may seem like there are a lot of problems when creating and editing PDFs manually, but don’t fret. We have the rundown on what to do in the subsections below.
When you need to collect a lot of information

It’s safe to assume that most organizations need to collect a lot of information. Whether a company is gathering data on customer insights, sales leads, or event registrations, there’s seldom a time when we’re not looking for some information to understand our business components better.
But the problem with gathering a lot of information is figuring out ways to organize and manage it. Since we’re bombarded with data every day, using a strong data collection tool is imperative to help sift through the white noise and get to the important points.
Here are a few steps that will help you collect information the right way:
1. Choose a robust tool
There are many tools out there that range from free to pricey, depending on your needs. Choosing a strong tool is the first order of business before embarking on your information collection journey because it will help you gather information efficiently and effectively. Many information collection tools come with free starter plans, so you’ll have plenty of options to figure out which tool will work best for you.
2. Ask pointed questions
After you decide on a tool to use, ask yourself a few questions, such as, “Why are you collecting information,” “What is its purpose,” and, “What do you want to do with the information?” Asking pointed questions will help you get to the crux of why you need data and how you’re using it. Just like anything else in life, there’s no point in doing something unless there’s a purpose behind it.
3. Define your goals
Make sure to clarify your goals once you’re clear about why you want to collect information. Defining your information collection goals will make organizing and managing the task much easier, especially when you’re gathering and managing large amounts of data. A big information collection issue is not having a big-picture mindset about what information to collect and what should be understood from the data.
4. Determine a plan of action
Next, it’s time to develop a plan around organizing your data. This will vary depending on the tool you choose, answers to your questions, and your goals. Having a plan is important because it will help you achieve your goals and stay on the path to success.
5. Start collecting
Once you have everything in place, you can start collecting information. Collecting your information is exciting because you’ll be able to cross-reference data with your goals and plan to determine if you’re going in the right direction. After you’ve collected your information, make sure it’s orderly and presented in a way that makes sense to you and anyone else who will be using it. There’s nothing worse than trying to decipher data that has no structure to it.
When you need to turn that information into documents
Once you’ve gathered your information, it’s time to turn it into a presentable document that can be shared with the world.
Before taking on the task of turning your data into a document, revisit your answers to the key questions outlined at the start of your project: Why are you collecting information? What is its purpose? What do you want to do with the information? What’s more, you should keep your goals and plan at the forefront of your mind so you understand what type of data must be included in a PDF.
When you’re completely clear about what you want from your data, you’ll be ready to turn it into a document. Though this seems easy in theory, there’s actually a lot of manual labor involved in the process. It can take extra time, energy, and attention to detail to get your data into a document and have it look just right.
Since many organizations collect a lot of data through Microsoft Excel or Google Sheets, it’s not always easy to turn that information into documents. Healthcare companies are a great example of this. They receive mass amounts of patient data every single day, including general information, current state of health, health records, medication usage, and family health history.
But healthcare organizations must find a way to consolidate this data into one document so they can share it easily with medical staff, referral doctors, and patients. When healthcare professionals make PDFs, they oftentimes need to copy and paste the information by hand, which isn’t very efficient. It’s a problem and a huge strain on limited resources.
It’s not just healthcare, though. Small and large businesses; nonprofits; and educational institutions struggle with turning valuable information into documents. You also can face similar hardships while creating a custom design for your PDF.
When you need a custom design for your PDFs

PDF files come in all shapes and sizes. Whether you’re using it for contracts, tickets, coupons, or certificates, a well-designed PDF document plays a crucial role in making the right impression.
Most organizations are plagued with the need for a well-designed PDF. Nonprofits, for instance, need custom PDFs designed for event invitations. Let’s say that a nonprofit has a big gala coming up and needs to collect names, addresses, and phone numbers of interested people. They funnel this data into a Microsoft Excel sheet, which is great, but how will that information be used to create invitations?
The nonprofit needs to transfer the data into a professional-looking document so they can mail out formal invitations. Usually, the easiest way to do this is to extract information manually from an Excel spreadsheet, place it into a PDF, and figure out a way to design it. Designing a PDF this way is unproductive, especially when there are automated ways to streamline the process.
There are many other examples in which organizations or individuals must turn information into documents. This is a common situation for contractual agreements, including instances when a real estate agent, financial professional, or advertising agent must turn information about a deal into a document. For example, if a financial planner wants to close a deal on an investment opportunity and must transfer client information into a PDF, he or she will want a seamless way to get it done. Simply turning information into documents will save time and increase productivity. Turning information into documents also allows for easy sharing, which can be implemented by companies – large and small.
Now, let’s talk about a PDF’s aesthetics. Though a good-looking PDF design is important, the process of getting there isn’t always easy. PDF files, by nature, don’t come to mind immediately when it comes to aesthetically pleasing design. But that doesn’t mean PDFs should be boring and drab!
You don’t need to be a designer to create a PDF, but you should have an action plan in mind. Oftentimes, design software has a lot of bells and whistles that can feel overwhelming to people with non-design backgrounds. Moreover, the surplus of features can have an adverse effect and encourage people to add more colors, fonts, and images unnecessarily.
Before getting started, think about what you want your PDF to achieve. What is its purpose? What point are you trying to make? What do you want people to glean from it?
For example, if you’re a real estate agent, your goal is to collect leads and send them a weekly, email newsletter that displays homes you’ve listed for sale. In this case, your PDF’s purpose might be to generate attention and encourage leads to call you about the advertised homes for sale. The design of your PDF would be personalized to display a lead’s first and last name, as well as share pictures of the homes that you’ve listed for sale. The PDF’s design would be customized with branding, images, and content that is relevant for your leads. Luckily, there are ways to automate this process. Read on to learn more!
Automate PDF Creation Using Online Forms
You’ve heard about the problems with creating a PDF manually. It sucks your valuable time and adds tedious work to your day. So the question remains: how do you automate this process
Believe it or not, by using online forms.
Online forms are still the easiest way to input information, and new form technology has made the process easier and easier for the responder — whether it’s your customers, students, or colleagues. More importantly, a lot of forms you encounter today are easy to fill out from mobile and tablet devices, meaning higher completion rates and more accurate information.
Using online forms, you can collect signatures, dates, long text fields, images, and just about anything else you can imagine.
Do More with JotForm PDF Editor
Need a way to design customized documents seamlessly using data from completed forms that you make and send out?
Now, there’s a new way to make it happen with JotForm PDF Editor.
JotForm’s tool lets you design a PDF template by dragging and clicking. It connects to any online form you have with the platform, and responses that you receive through your form automatically populate sections of the PDF with the information you need. So, that one PDF template you create automatically turns into dozens, hundreds, or even thousands of unique PDFs as people fill out your form and submit it to you.
Regardless of whether you use PDFs internally or want it sent out to clients as a professional-looking document, you need a fast way to automate the process. JotForm forms and this product solves this problem by turning form responses into designed PDFs. It requires a minimal amount of time up front but saves hours of time and allows you to become more productive.
The features of the tool comes to serve the common problems of everyday PDF users since it came as an idea from listening to our users and their problems in many different industries. Automation, design, communication and durability were 4 main pillars that came out from all that we have build our product on.
JotForm users across a diverse range of industries — from a paint distributor in Calgary, Canada, to an event management company in Metro Vancouver, Canada — have tried PDF Editor and incorporated it into their workflows. With JotForm PDF Editor, you can not only turn submission data into polished PDF documents that can be shared with clients but also create a plain copy for your records. What’s more, the layout features in this useful product can help you put your personal touch on documents — add a business logo, or change the font color, font type, background color, line spacing, and page margins. Many of these new features were directly inspired by our users, who felt there was a better way to turn bland, clunky PDFs into professional-looking documents.
Field Assessments
Anyone who works in the field needs to have an airtight system for not only collecting information, but also for sending it back to the office. There’s naturally a lot of friction in this process. If the final assessment of field data is supposed to be shown as a polished, professional PDF, then how on earth do you simplify that?
Automation, of course.
Start with a simple web form that includes fields asking for the data you’d need inputted from out in the field. Then, you can have the assessment PDFs generated automatically whenever you submit all the information you need.
Performance Evaluation
Students and employees alike benefit from performance evaluations. A great way to standardize your evaluations across the board is by using the same online form for each evaluee. But when it comes time to share that evaluation information, what then?
Having the responded form automatically create a well-designed performance evaluation PDF with all of the evaluation information eliminates the time-consuming step of copying and pasting the form data into a different file. The final PDF is not only great for your records, but it’s a great file type to send to colleagues and the evaluee themselves.
Certificates

Say you’ve hosted a conference or a workshop and want to give participants a professional certificate for attending. You could email each of your participants, find out how they’d like their name spelled on the certificates, and then manually type in each of them on separate Word docs. When you’ve finished doing that, you can save each of the files as separate PDFs and then email them back to the attendees. You could do that. Just like you could order sandwiches at Starbucks. It’s a possibility, sure. But there are clearly more suitable options.
Instead, you can send each of your participants the same exact online form asking them to enter how they’d like their name on the certificate. On the other end, after they submit the form, is a beautifully-designed PDF certificate. You can give it a once over to make sure there aren’t any errors in what they entered, but it should be ready to send back their way. All of the work is done upfront with designing the certificate; then the rest of the work is done for you once they enter information into your form.
Work Orders and Incident Reports
Work orders can either be generated from a customer request or internally within your organization. They’re designed to get a better idea of the work that’s needed, the cost required, when and how it will be completed, and by whom the work will be completed.
The only problem is, they can be a pain to create manually. Sure, you can create a work order template in a word processor and add information whenever a customer sends a request. But the time-saving method of generating a work order again requires a simple online form. Your customer or colleague can fill out an online form with the information you need, and your work order PDF can automatically be populated with the new info.

-
-
-